top of page
On this page:
Exercise 1: Gradient
Exercise 2: Type Animation
Exercise 3: Puppet Pin Demo
Exercise 4: Puppet Pin
Exercise 1 :
Gradient
Gradient
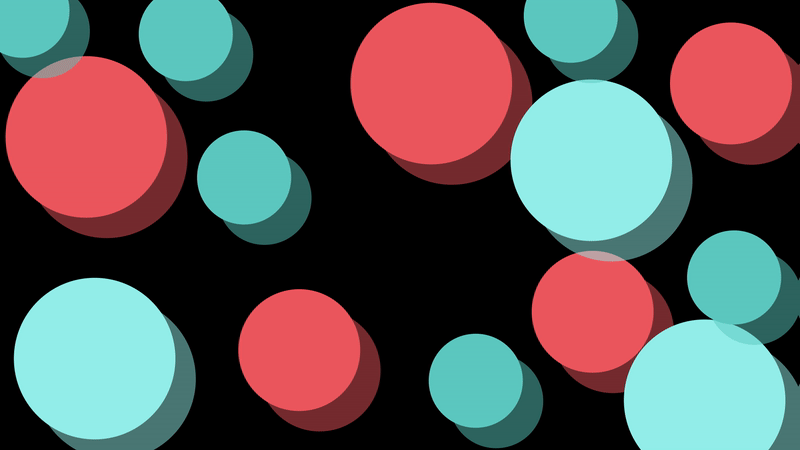
For the first exercise we were supposed to create a gradient background.
Shapes Composition
I created the shapes composition first where I added a couple of circles with different colours. To each circle I applied a drop shadow effect with some opacity. Once done, I precompose the layers together to create a Shape Animation Composition.

Shapes Composition
Shapes Composition
In this composition, I primarily set the direction of how these shapes will move which will contribute to the motion in the final animation. I applied the CCRepeTile to mirror the circles so that the animation will not cut off halfway. I also set timeframes to move the shapes to the left.
Shapes Animation
Blur
To create the blur effect, I applied the Turbulent Displace Effect. It is a distortion effect that makes things look warped. The directional blur turns these solid circles into these motion streaks. Unlike Gaussian Blur where the effect smooths the object in all directions, the effect blurs the object in a single direction.

Turbulent Displace Animation
Blur
To create the blur effect, I applied the Turbulent Displace Effect. It is a distortion effect that makes things look warped. The directional blur turns these solid circles into these motion streaks. Unlike Gaussian Blur where the effect smooths the object in all directions, the effect blurs the object in a single direction.

Post-Turbulent Displace Effect
Final Outcome
We also tried out applying mask layer and played with different blending modes to acheive different effects. I really wanted to use the Dancing Dissolve Blending Mode however for some weird reason the video doesn't render out properly.

Dancing Dissolve Blending Mode
Final Video
Type
Exercise 2 :
Type
For this exercise we learnt how to create retro-style type with gradient backgrounds and play with some preset type animation.
Gradient Background
I wanted to recreate this background that I saw on google. By using a Linear Gradient, I was able to experiment with multiple colour stops, transitioning from deep blues to purples, blacks, and whites. When stops are spaced far apart, the gradient appears more gradual and blended, creating a soft and subtle transition. However, moving the stops closer together compresses the color changes into a smaller area, resulting in sharper, more defined shifts between hues.

Retro Background

Gradient Stops

Gradient Background
Track Matte
Creating this text effect using a Track Matte allowing us to layer and mask the text to the background. This is done by setting the background layer to track matte the text layer.

Trying different presets
I applied the diagonal blur effect which elongates the text along a set angle, making the text appear as if it's pulsating, almost like a radio frequency effect. I find that this approach works well for futuristic, glitch, or energetic typography animations.
Process of Track Matte
Final output video
Exercise 3 :
Puppet Pin Demo
Puppet Pin Demo
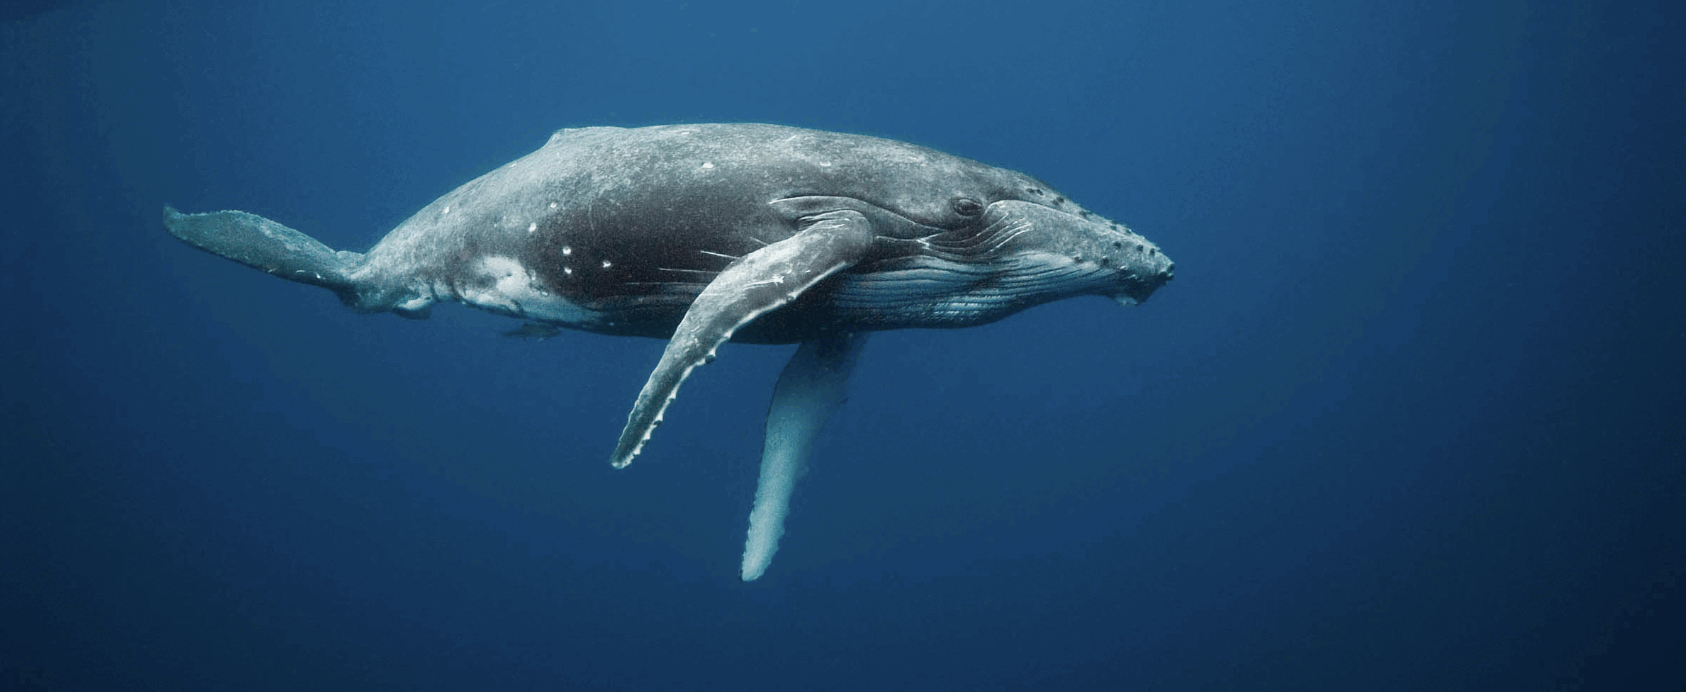
For this exercise we learnt how to use the puppet pin animation to make a static image move by adding puppet pins to control the "limbs".
Photoshop
First we had to use Photoshop to separate the whale and the ocean layers. I finally learnt how to use content-aware fill. The key is to first expand the initial selection so that it can fill the empty space based on the expanded area around it.
Object Selection Tool & Content Aware Fill
3D Layer
In After Effects, I imported the background, whale and the diver. The ocean is the background, the whale will be the "midground" and the diver will be the foreground. Turning on the 3D Layer in After Effects opens up a whole new level of depth and motion, By enabling the 3D layer (the small cube icon) on each layer, I was able to manipulate them along the Z axis. I then shifted the ocean to the back and the diver to the front, the three white lines representing the various layers are now staggered.

Top View
3D Layer
I then added puppet pins near the tail, the top of the head and near the joint of the fins to make the whale move. Definitely need more study on how characters move so that the animation is more smooth and realistic.

Whale Animation
Camera
Adding the camera is kind of like I was taking a video of this scene. By adjusting the scale of the camera is like zooming into the scene just as how we would normally do when taking a video.
Diver
We intended for the diver to move closer to the whale as the camera is zoomed in and this is achieved by setting keyframes to the position of the whale.
Bubble
The different blending modes allow this bubble video to add texture and additional moving details making the once inanimate scene, come to life.
Final Video
Exercise 4 :
Puppet Pin
Puppet Pin
For the exercise I decided to go with Wanderer Above The Sea of Fog because <3 Caspar David Friedrich. Peep my work from earlier days of painting hahahahahahaha. Anyway for this rendition I decided to add cat cos <3 cats.

Separate Layers
Similar to the demo, I applied the same method to separate the man from the background. Well I had to use generative AI to fill the background.


Photoshop Layers
After Effects
I set the position of the man + rocks and cat as the foreground and the background respectively such that they are staggered. I have also added a subtle smoke video so that it resembles moving clouds and changed the blending mode. This layer is placed on top of the background and underneath the foreground. For the cat, I wanted the ears to twitch and the tails to swing a little, as such adding the puppet pins as show below. The keyframes are set across 10s to create more subtle and slowed movements. I also applied hue and saturation to make the cat blend with the painting's palette more.

Cat Puppet Pins
Final Video
This week is indeed a lot of learning new skills which is essential for video editing. The puppet pin animation will come in handy in the future when I intend to do character animation for marketing and branding videos. Separating the foreground, background, and animated objects made everything feel more immersive, especially with parallax movement and camera animation. Turning on 3D layers took it even further, letting me move objects in depth, play with lighting, and create a more dynamic look. It was a great way to see how simple tweaks can turn flat designs into something way more engaging!
bottom of page