top of page
On this page:
Project Intro
Ideation
Technique 1: Paper Clay
Technique 2: Mark Making
Technique 3: Paper Weaving
Technique 4: Paper Making
Automata
Assembly
Project Intro
Project Intro
The final project before the semester ends. It was a fun but challenging process. I learnt a lot along the way. There were many times where I wanted to give up the kinetic automata element but I persevered on and I am glad that I did. Presenting to you "White in Whimsy"...
"White in Whimsy" is a kinetic automata crafted with a playful blend of paper techniques—from paper-making to paper clay and weaving. It embodies a sense of childlike wonder, inviting people of all ages to discover joy in the surprising dance between structure and whimsy, stillness and motion, white and bursts of colours.
White in Whimsy
Ideation
I wanted to have a kinetic element for my final artefact. I have not done any kinetic automata before so I thought this is the best time I could try it out. I was prepared to fail many times but it's through the iteration that brought me closer to my final outcome.
Ideation
My art style has always been whimsical so I wanted to incorporate that element into the final artefact. The colour palette that I was going for was white base with many colourful elements. A little clown figurine was chosen to add a playful element together with many inorganic clay figurines that are inspired by nature. My original intention was to have two kinetic elements - one rotating and another moving up and down.

Initial Design Sketch
Technique 1:
Paper Clay
Paper Clay
As we used wall putty instead of calcium sulphate, the mixture was wetter as compared to the original recipe. The recipe was essentially "mix-until-everything-forms-into-a-lump-of-dough". The texture wasn't like normal clay and it bounces back a little bit but I could still shape it well so it works well for me!


I then molded the clay into various shapes to create the small figures, and I had several key takeaways from working with paper clay:
1. Avoid molding when the clay is slightly dry, as it won't hold its shape well.
2. Scoring the clay and using a bit of water as adhesive are essential to ensure the pieces stick securely.
3. Using a wireframe gives the clay a solid foundation, enabling it to maintain more complex shapes and adding rigidity. I experimented with this technique in the blue inorganic structure.


Clay Pieces painted in acrylic Paint and finished with mod podge

Technique 2:
Mark Making
Mark Making
From the Mark Making DMA lesson, I discovered that there are many ways we can do mark making from lino block to everyday items. I applied what I have learnt to the clay pieces.

I used the back of the brush to make indents on the clay.

Wire to create dots, dabbing paint using masking tape rolled into ball, strip of paper dipped in paint (left to right)
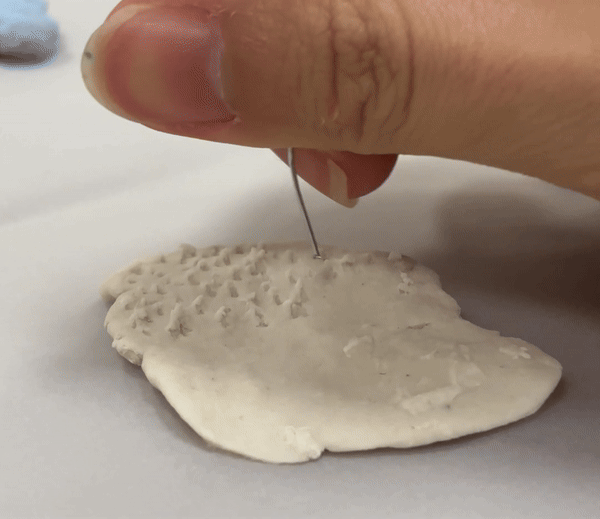
Mark making on clay using wire to create textures.
I also reused this Lino block that I made using DMA class which mimic stone pathways.

Before & After stamping onto clay!


Technique 3:
Paper Weaving
Paper Weaving
These are offcuts from printer shop. Yes. I saw it in the "trash bag" and asked the printer uncle for it. These strips are about 3mm wide. I started off with a 6 x 6 grid, that itself was tough. My small hands were struggling with these small strips but there was progress and I managed to weave the entire thing. I added a few white strips of paper that were of thicker gsm to give it more structure. I also glued the edges to prevent the strips from coming loose. These form the wings of the butterfly.


Butterfly Prototype 1
I experimented with lino printed butterfly wing patterns. However I thought it would be more interesting to have all the wings to be that paper weaving pattern so this did not make it to the final outcome. Also the paper that I use was too thin and the paper keeps curling.
Technique 4:
Paper Making
Paper Making

I made white paper and also used the paper that I made previous during DMA to form the paper flower. I cut the paper into these heart shape like petal shapes. Then applied glue at the end and stick it on the stem made out of leftover offcut paper strips.


Flower Prototype 1 which didn't survive my endless automata testing.
I wanted to make grass patch using paper pulp in which I was lazy to repeat the blending process all over again so I thought I could just soak the papers that were made in coloured water. Nope, didn't work as the paper starts disintegrating and the texture wasn't what I wanted.
So after soaking, I just blend it all over again to form green paper pulp. I compact it over an acrylic sheet, squeezed out any excess water and leave out to dry. The end product was exactly what I wanted! The dried paper pulp had this rough texture. The green dye faded a fair bit so I had to paint with acrylic paint later.


Automata
Automata
I almost gave up halfway as I didn't have access to these hand tools readily. I struggled many nights trying to get the mechanism to work and working with whatever scrap materials that i have and to improvise.

Prototype 1:
This was the most ideal prototype but I didn't have the right resources to carry on as I had to drill about 6-8mm holes into the wood. I didn't want to waste the dowels used so I decided to improvise.

Ideation Sketch
The idea was to cut the dowel in half, bend the wire and connect it to the dowels.
Prototype 2:
I managed to connect the dowels to the wire and felt that the wire (paperclip) was not sturdy enough. As such I wrapped clay around the wire to give it more strength and structure.

Mechanism 1:
This was my first mechanism that I tested out, it wasn't the best method as the Daiso paperclip was not as strong and upon looking at the design it is not suitable.
And this was when my rounds of testing and redoing begins. :( This would not have happened if I understood the loose wire mechanism which was essential in allowing the wire mechanism to work. In automata, "loose wire" refers to flexible or unsecured wires that allow movement without being fully fixed in place.

I even tried another mechanism using cardboard to replicate the very first wood mechanism that I did but it wasn't sturdy and flops. The weights were not heavy enough for the automata to work. So many things went wrong at this point and I wanted to give up.
I decided to assemble the elements first and figure out the automata component later.
Assembly
Assembly
Base Structure:
I cut some MDF boards to form the base structure and then painted white. I then glued the sizes down

Painting & Assembling Elements:
Gluing pieces down and fixing with mod podge.

Automata:
My long dreaded automata. I was trying around with the 3 different automata and trying to troubleshoot. However the mechanism was not working out. Then I realised the problem after looking at other Youtube videos.

The problem was because my wires that were connected to the butterfly were too tightly wrapped around the rotating piece. So after many many rounds of bending and unbending the wire...

Presenting to you Automata 2.11
Fall down seven, stand up eleven
Butterfly:
After rounds and rounds of testing, my weaved butterfly starts to loosen and tear a little. So I had to reinforce by applying mod podge and also added a thicker white paper at the back. Though it affected the look that I was going for, it helped with the mechanism so I guess it is a win.
Presenting to you White in Whimsy


It was very rewarding to see my idea slowly come to life. From the clay making to the testing of the automata mechanism, though every step felt like a challenge I learnt the importance of trial and error. The whole idea of not being afraid to fail is evident here as I had to get pass the failures to keep trying until it works out the way it should. I also became more sensitive to paper thickness, ensuring to consider it if I am going to work with paper weaving or paper engineering to ensure that my elements don't get destroyed before submission. I was also intrigued by the many ways that we can use paper in our crafts. In a world increasingly focused on sustainability, I feel a responsibility to explore eco-friendly materials and processes. For example, using printer offcuts in my projects allows me to repurpose leftover materials that would otherwise go to waste. Being more conscious about our world is something that I as an aspiring designer can always put at the back of my mind. I aim to weave this consciousness into my future works, considering how even small choices can impact the environment.
bottom of page